Stage 3 - Specifying Question Logic and Piped Text
How to specify question branching, skip logic, and piped text in Experience Sampler

To specify question logic, you will need to uncomment the second portion of the recordResponse function.
Question Branching
To implement question branching, you need to create a variable that records the response to the question that determines which branch of the questionnaire
participants get. For example, if participants get one set of questions if they experience a particular event and another set of questions if they don't experience
that event, you may want to name your variable phenomenonPresence. We make the response to the question asking about whether
participants experienced this event equal to phenomenonPresence.
For example, if we are interested in whether participants made a social comparison, and the social comparison question is the first question (i.e., question index =0), this
is what the code would look like
if (count == 0) {comparisonResponse = response;}
In this example, comparisonResponse is our equivalent of phenomenonPresence.
The point where the questionnaire splits into its two or more branches does not have to occur immediately after you ask the question that determines which branch participants complete.
That is, in our example, the branching does not have to occur for the next question, it can occur after question 10 or question 5.
At the point where you want the questionnaire to split, you will have to customize the following two lines of code:
else if (count == X && phenomenonPresence == Y){app.renderQuestion(A);}
else if (count == X && phenomenonPresence == Z){app.renderQuestion(B);}
where
X is the question index of the question before the questionnaire branches (again, this does not need to be the question that asks participants to indicate whether the
event occurred or not).
Y is the response value that indicates that the event was present
Z is the response value that indicates that the event was absent
A is the question index of the question that the app should skip to if the event was present
B is the question index of the question that the app should skip to if the event was absent
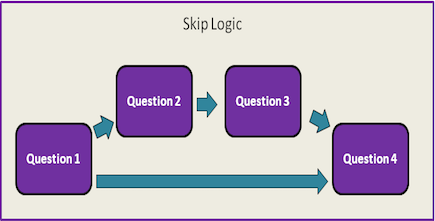
Skip Logic
A similar format is used to specify question logic in the recordResponse function, except instead of
phenomenonPresence, these lines use the response variable. The response variable
specifies which response value or values need to be selected in order for a certain question to be shown. For example, if you have an "other"
option in your multiple choice question that you would like participants to specify, you can do so like this:
else if (count == X & response < Y){app.renderQuestion(Z);}
else if (count == X && response == Y){app.renderQuestion(A);}
where
X is the question index of the question
Y is the response value associated with the "other" option
Z is the question index of the question that the questionnaire should skip to if "other" is NOT chosen
A is the question index of the question that the app should skip to so participants can specify what they meant by "other"
Skip Logic for Checklist Questions
The response for a checklist question is saved as a string of the list of the responses selected. To implement skip logic for checklist responses, you will need to use the indexOf function to determine whether the response option is in the string of responses selected. The indexOf tells you the position of a specific value in a string with 0 being the first position, 1 being the second position, and so forth.
If you want to display a question if a participant selected a specific response in the checklist, the if statement would look like this
else if (count == X && response.indexOf("Y")>=0){app.renderQuestion(Z);}
where
X is the question index of the question
Y is the response value selected
Z is the question index of the question that the app should go to if this response is selected
The statement response.indexOf("Y")>=0 is telling ExperienceSampler to determine whether the response of interest is in the string of checklist responses selected.
Alternatively, you can display a question if the participant did NOT select a response by changing the value of response.indexOf("Y") from >=0 to ===-1. For example, if your follow-up question is asking for more details about the participant's' interaction partner, and all the options in the checklist are about people except for one option, then this method is more efficient than including an if statement for each response selected in the checklist. That is, if you have 6 options in your checklist, you could write 1 if statement by setting the value of indexOf to -1 instead of 5 if statements that each set the value of indexOf to >=0. The indexOf function interprets ===-1 to mean that specific value is NOT included in the string, so your if statement now looks like this
else if (count == X && response.indexOf("Y")===-1){app.renderQuestion(Z);}
where
X is the question index of the question
Y is the response value that is NOT selected
Z is the question index of the question that the app should go to if this response is NOT selected
Finally, you can place the code needed to fade the current question out,
$("#question").fadeOut(400, function () {$("#question").html("");
in front of the app.renderQuestion() function inside each else if statements. This feature accompanies the fade-in feature in the renderQuestion function, and lets participants know that ExperienceSampler is advancing to the next question. You can choose to omit this, but we recommend including it because the fade-in feature is more aesthetically pleasing when its fade-out counterpart accompanies it.
No Logic or Branching Specified?
When no question logic or question branching is specified, the function will progress through the questions in the order in which they are entered into
surveyQuestion. To ensure this occurs, you should uncomment the else in the second last line of the recordResponse function:
/*else*/ if (count < surveyQuestions.length-1){app.renderQuestion(count+1);}
We commented out this else so that you could first test whether all your questions were being displayed in the correct format in Stage 1, but to implement question logic,
this statement must be an "else if" statement.
Specifying End-of-Questionnaire Messages
To specify which end-of-questionnaire message is shown after the participant setup questions, you can customize this line of the recordResponse function:
if (count == -1){app.scheduleNotifs();app.renderLastPage(lastPage[X], count);app.scheduledNotifs();}
where X is the index number of the message from the lastPage variable.
This line states that when the app gets to the last question of participant setup, it should schedule all notifications (which we will learn to do in Stage 5), then render the last page,
and then list all the IDs of the notifications that have been scheduled.
To specify which end-of-questionnaire message participants receive when they complete the entire questionnaire, you will have customize the last line of the recordResponse function:
else {app.renderLastPage(lastPage[X], count);};
where X is the index number of the message from the lastPage variable.
Piped Text
To implement piped text, you will need to use a placeholder for your piped text in your actual question and choice wording. You will then need to tell ExperienceSampler with which response it should replace this placeholder. For example, you could be interested in learning more about a social interaction with one particular person, so you ask participants to input their interaction partner’s name as part of your questionnaire and you pipe this name into the subsequent questions and choices.
First, we will go over how to specify which response to replace the placeholder with, then we will explain how to pipe text into question wording, and then how to pipe text into choice wording.
Placeholder and Response
First, you will need a placeholder for the piped text. For example, if you want to pipe the interaction partner’s name into your question and choice wordings, you may want to use NAME as your placeholder. You can place this placeholder anywhere you want the piped text to appear. You do this in surveyQuestions. If you want to pipe in more than one response, you will need a placeholder for each response you want to pipe. Now you want to tell ExperienceSampler with which response it should replace this placeholder.First you have to declare a global variable for the response that you with which to replace the placeholder. A global variable is a variable that all functions in ExperienceSampler can access. We want to declare this response as a global variable because several functions will need to use this variable, and we want all these functions to use the same variable. To make a variable global, you declare it outside of a function. This is how all the functions know to use the same variable. In contrast, if you declare the variable inside a function, it is a local variable. A local variable can only be used in the function in which it was declared. The variable is created when the function starts and deleted when the function ends. You do not want this variable to disappear once one function finishes using it because then another function cannot use it. To learn more about local and global variables, please see this W3Schools page.
To declare the response variable, go to the section after the participant setup questions. You will see a few lines that all start with var, which will let ExperienceSampler know that you are declaring a variable not a function. This is where we have been declaring all the global variables for ExperienceSampler. At the end of this block of code, you should declare the global variable for your response variable. Going back to the name example, we can make this response variable be name:
var name. You may think that ExperienceSampler will confuse this variable with the placeholder, but it will not because all variables are case-sensitive.
But we did not assign a value to this variable yet. To do this, you will need to use an if statement in the recordResponse function, just like when you implement skip logic. This will be an if statement that you specify at the very beginning of the block of conditional statements in the recordResponse function. Place this if statement above the if (count <= -1){uniqueRecord = currentQuestion} statement.
For this if statement, you want to tell ExperienceSampler that if it is on the question where the piped text is entered, it should assign the value of that response to the global variable. For our example, let’s say the the index number of the question where you ask the participant to input the name of their interaction partner is 6. Then the if statement will look like this:
if (count == 6){name = response;}.
Now ExperienceSampler knows that the response the participant inputs for this question is the value it should assign to the name variable.
Piped Text in Question Wording
Now we have to tell ExperienceSampler to replace all our placeholders with our piped text. Again, we do this using an if statement. Because we want to change the way our questions appear, we will put these if statement in the renderQuestion function. This statement should be placed after the var questionPrompt = question.questionPrompt line, but before the question.questionText = Mustache.render… line at the beginning of the renderQuestion function.Now think about what the condition is and what we want ExperienceSampler to do when it encounters this condition: If ExperienceSampler encounters a question that contains our placeholder, we want it to replace it with our piped text.
Returning to our name example, the first part of our if statement will be
if (questionPrompt.indexOf('NAME') >= 0).
The first part tells ExperienceSampler that it should search questionPrompt, the variable that represents the question wording, for our placeholder, NAME. The indexOf function determines the questionPrompt contains our placeholder NAME.
If questionPrompt does NOT contain NAME, indexOf will be -1.
If questionPrompt does contain NAME, indexOf will be 0 or greater.
The value of indexOf indicates the position of NAME in questionPrompt. For example, if indexOf equals 0, that means NAME appears at the very beginning of questionPrompt.
Now we tell ExperienceSampler what to do if it finds a questionPrompt that contains our placeholder.
We want ExperienceSampler to replace our placeholder with our response value. To do this, we use the replace function.
The replace function takes two arguments: the string it is finding and the new value.
The new value in the replace function should be a string, which is a constant value. In our case, however, we want to replace our placeholder with a variable because the value changes depending on the response to our question. To do this, we create a function that will return the value of our response variable. Going back to our example, this function would be
function replacer(){return name}.
Together, the whole action ExperienceSampler perform if it finds a placeholder in the question wording for our example is
questionPrompt = questionPrompt.replace(‘NAME’, function replacer() {return name}).
This statement says to replace the original questionPrompt with our new questionPrompt that replaces our placeholder, NAME, with the value of our response variable, name. Because we use the questionPrompt variable in this statement, we have to place it after the statement that declares the variable questionPrompt. We then want ExperienceSampler to display the question, which is why we place this statement before the next line, which renders it using Mustache.render.
Piped Text in Choice Wording
Once you understand how to pipe text into question wording, it is very easy to pipe text into the choice wording. It is exactly the same, except for two differences.For choice wording, instead of questionPrompt, we use label. So in our example, the piped text if statement becomes
if (label.indexOf(‘NAME’) >=0){label = label.replace(‘NAME’, function replacer() {return name})}.
The other difference is where we place this if statement. If you will recall, we had to specify the type of question for each question in surveyQuestions. We then tell ExperienceSampler how to render the format of the question in the renderQuestion function. The part of renderQuestion that does this is the section that follows the questionPrompt render statement (i.e., question.questionText = Mustache.render…) and starts with switch(question.type). In this part of the function, you will see the various types of question (e.g., case ‘checklist’:). The question types that you can pipe text into the choice wording are mult1, mult2, and checklist. For these question types, you will place the if statement in the same place.
First, determine which question types in your questionnaire will have piped text in the choice wording. For our example, let’s say that there is piped text in the choices for checklist questions. Next, locate the part of the renderQuestion function that displays your question type(s). In our example, we will look for the part of the code the starts with case ‘checklist’; however, the same will apply for mult1 and mult2. Once you find the part of the function that displays your question type, look for the following statement:
var label = question.labels[label_count++].label.
You will want to place your if statement after this statement, but before the question.buttons += Mustache.render… statement.
Notice that the placement of the choice wording piped text if statement is the same as the placement of the question wording piped text if statement. It appears after the statement that declares the variable that represents the choice wording for the question (i.e., var label), which we use in our choice wording if statement. We then want ExperienceSampler to display our new choices, so we render it using Mustache.render. Now you have piped text in your choice wording.
Now you're ready to move on to implementing the snooze feature!